Old-Fashioned Frozen Peach Crisp
There are some desserts that immediately make a house feel like home, and a warm fruit crisp is definitely one of them.
When sweet peaches are bubbling away beneath a golden, buttery oat topping, the whole kitchen fills with the kind of comforting aroma that makes everyone want to gather around the table.
This Old-Fashioned Frozen Peach Crisp is one of those wonderfully simple desserts that doesn’t require complicated techniques, expensive ingredients, or fresh peaches from the farmers’ market.
In fact, frozen sliced peaches work beautifully.
That means you can make this cozy peach dessert throughout the year, whenever you’re craving something warm, fruity, buttery, and homemade.
The peaches become soft and flavorful as they bake, while the oat topping turns golden brown and wonderfully crisp. Add a scoop of your favorite vanilla ice cream while the crisp is still slightly warm, and you have an especially comforting dessert.
If you love easy, old-fashioned desserts made with simple ingredients, this is definitely one to keep in your recipe collection.
What Is Old-Fashioned Frozen Peach Crisp?
Peach crisp is a classic fruit dessert made by baking sweetened fruit underneath a crumbly topping.
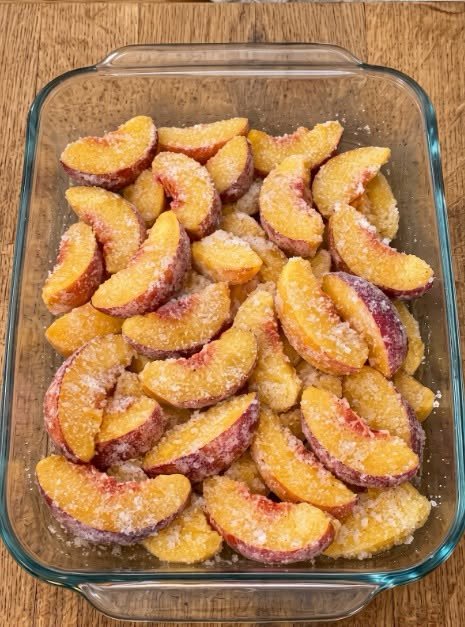
For this version, frozen sliced peaches are thawed and drained before being combined with granulated sugar, flour, vanilla, cinnamon, and lemon juice.
The peach mixture is then covered with a simple homemade topping made from:
- old-fashioned rolled oats
- all-purpose flour
- light brown sugar
- cinnamon
- salt
- melted butter
As the dessert bakes, the peaches become tender and juicy while the topping develops a beautiful golden-brown color and a deliciously buttery texture.
The result is a dessert that is soft and fruity underneath, crisp and crumbly on top, and filled with warm cinnamon flavor.
Why You’ll Love This Peach Crisp
There are plenty of reasons this recipe deserves a place in your dessert rotation.
Frozen peaches make it convenient
You don’t have to wait for peach season.
Frozen sliced peaches make it possible to enjoy this dessert whenever the craving strikes.
Simple pantry ingredients
Most of the ingredients are everyday staples that you may already have in your kitchen.
Easy preparation
There are no complicated pastry techniques or special equipment required.
A delicious buttery topping
The combination of rolled oats, brown sugar, flour, cinnamon, and melted butter creates that classic crisp texture.
Warm cinnamon flavor
Cinnamon complements the sweetness of the peaches and gives the dessert its cozy, old-fashioned character.
Perfect for sharing
A 9×9-inch baking dish makes a lovely dessert for a family dinner, weekend gathering, or casual get-together.
What Does Frozen Peach Crisp Taste Like?
This peach crisp has everything you want from a classic homemade fruit dessert.
The peaches are naturally sweet and juicy, while the granulated sugar enhances their flavor without overpowering them.
Vanilla adds warmth, cinnamon brings a gentle spice, and a little lemon juice adds brightness to the filling.
Then comes the topping.
The rolled oats and flour provide texture, the brown sugar adds a deeper sweetness, and melted butter brings everything together.
As it bakes, the topping becomes golden and crumbly while the peaches underneath bubble and soften.
Allowing the crisp to rest for 10–15 minutes after baking is important because it gives the fruit filling a chance to thicken slightly.
The result is a wonderfully comforting dessert with a beautiful contrast between tender peaches and crisp, buttery oats.
Ingredients You’ll Need
For the Peach Filling
- 6 cups frozen sliced peaches, thawed and drained
- ½ cup granulated sugar
- 2 tablespoons all-purpose flour
- 1 teaspoon vanilla extract
- ½ teaspoon ground cinnamon
- 1 tablespoon lemon juice
For the Crisp Topping
- 1 cup old-fashioned rolled oats
- ¾ cup all-purpose flour
- ½ cup packed light brown sugar
- ½ teaspoon ground cinnamon
- ¼ teaspoon salt
- ½ cup unsalted butter, melted
Kitchen Tools You’ll Need
You don’t need much equipment to make this easy dessert.
You’ll need:
- 9×9-inch baking dish
- Large mixing bowl
- Medium mixing bowl
- Mixing spoon or spatula
- Measuring cups
- Measuring spoons
Lightly grease the baking dish before assembling the crisp.
How to Make Old-Fashioned Frozen Peach Crisp
Step 1: Preheat the Oven
Begin by preheating your oven to 375°F (190°C).
Lightly grease a 9×9-inch baking dish and set it aside.
Preparing the dish first makes assembly quick and easy once your peach mixture and topping are ready.
Step 2: Prepare the Peaches
Place the 6 cups of thawed and drained frozen peaches into a large mixing bowl.
Add:
- ½ cup granulated sugar
- 2 tablespoons all-purpose flour
- 1 teaspoon vanilla extract
- ½ teaspoon ground cinnamon
- 1 tablespoon lemon juice
Gently stir everything together until the peach slices are evenly coated.
Try not to stir too aggressively. Keeping the peach slices intact gives the finished dessert a more appealing texture.
Step 3: Make the Crisp Topping
In a separate medium-sized bowl, combine:
- 1 cup old-fashioned rolled oats
- ¾ cup all-purpose flour
- ½ cup packed light brown sugar
- ½ teaspoon ground cinnamon
- ¼ teaspoon salt
Mix the dry ingredients together.
Then pour in the ½ cup melted unsalted butter.
Stir until the mixture is evenly moistened and begins to form a crumbly topping.
You don’t want a smooth dough. The mixture should remain loose and crumbly so it can create that classic crisp texture while baking.
Step 4: Assemble the Peach Crisp
Pour the prepared peach mixture into the greased 9×9-inch baking dish.
Spread the peaches into an even layer.
Next, sprinkle the oat topping evenly over the entire surface.
Try to cover the peaches from edge to edge so that every serving gets plenty of that delicious buttery topping.
Step 5: Bake
Place the baking dish in the preheated oven.
Bake for approximately 45–50 minutes.
Keep an eye on the dessert toward the end of the baking time.
You’ll know it’s ready when:
- the peach filling is bubbling around the edges
- the topping is golden brown
- the kitchen smells wonderfully warm and fruity
The golden topping is your visual cue that the crisp is ready to come out of the oven.
Step 6: Let It Cool Slightly
Remove the peach crisp from the oven and let it rest for 10–15 minutes before serving.
I know it’s tempting to grab a spoon immediately!
But giving the dessert a few minutes to cool allows the peach filling to thicken slightly.
This makes the crisp easier to serve and gives the flavors a little time to settle.
What to Serve With Peach Crisp
This peach crisp is delicious all by itself, especially while it is still warm.
But if you want to make it feel a little more special, serve it with a cool accompaniment.
A scoop of vanilla ice cream is a classic choice. The contrast between the warm peaches, crisp topping, and cold creamy ice cream is absolutely wonderful.
You can also simply enjoy a warm serving alongside a cup of coffee or tea for a cozy afternoon treat.
Whether you’re serving it after dinner or enjoying a small portion with your morning coffee, this dessert has a wonderfully comforting homemade quality.
Tips for Making the Best Peach Crisp
Drain the peaches well
Because frozen peaches release liquid as they thaw, make sure they are properly drained before preparing the filling.
Too much excess liquid can make the finished dessert wetter than intended.
Stir the peaches gently
Mix the peaches carefully with the sugar, flour, vanilla, cinnamon, and lemon juice.
Gentle stirring helps keep the peach slices intact.
Use old-fashioned rolled oats
The recipe specifically calls for old-fashioned rolled oats, which provide the hearty texture associated with a traditional crisp topping.
Make sure the butter is evenly incorporated
When mixing the melted butter into the topping ingredients, stir until everything is evenly moistened.
This helps prevent large areas of dry flour or oats.
Don’t forget the bubbling
The bubbling peach filling around the edges is an important visual cue that the fruit has heated through and the dessert is ready.
Give it time to rest
Those final 10–15 minutes of resting time really do make a difference.
The filling has an opportunity to settle and thicken slightly, making the crisp easier to serve.
Can You Use Fresh Peaches?
This particular recipe is written specifically for frozen sliced peaches, so the ingredient quantities and preparation instructions are based on using thawed and drained frozen fruit.
If you want to experiment with fresh peaches, remember that fresh fruit can vary considerably in sweetness, firmness, and moisture content.
For the most predictable result with this recipe, stick with the specified frozen peaches.
How to Store Peach Crisp
The original recipe does not specify storage or reheating instructions, so exact storage times and reheating methods aren’t included here.
If you’re planning to make the dessert ahead of time, it’s best to determine your preferred storage method based on how and when you plan to serve it.
Frequently Asked Questions
Can I use frozen peaches for peach crisp?
Absolutely. This recipe is specifically designed for frozen sliced peaches.
Simply thaw and drain the peaches before combining them with the filling ingredients.
Do I need to drain frozen peaches?
Yes.
The recipe calls for 6 cups of frozen sliced peaches, thawed and drained.
Removing excess liquid helps keep the filling from becoming unnecessarily watery.
What kind of oats should I use?
Use old-fashioned rolled oats.
They provide the hearty, slightly chewy texture that works especially well in a classic fruit crisp topping.
Why is flour added to the peach filling?
The recipe uses 2 tablespoons of all-purpose flour in the peach filling.
It is mixed with the peaches, sugar, vanilla, cinnamon, and lemon juice as part of the filling mixture.
How long does peach crisp bake?
Bake the crisp at 375°F (190°C) for approximately 45–50 minutes.
Look for bubbling around the edges and a golden-brown topping.
How long should peach crisp cool?
Let it rest for approximately 10–15 minutes after removing it from the oven.
This gives the filling a chance to thicken slightly before serving.
Can I make the topping separately?
Yes.
The topping is prepared in a separate bowl and then sprinkled evenly over the peach filling before baking.
Recipe at a Glance
Recipe: Old-Fashioned Frozen Peach Crisp
Prep: Simple mixing and assembly
Oven temperature: 375°F (190°C)
Baking dish: 9×9-inch
Bake time: 45–50 minutes
Cooling time: 10–15 minutes
Main fruit: Frozen sliced peaches
Topping: Rolled oats, flour, brown sugar, cinnamon, salt, and butter
More Peach Desserts to Try
If you’re a peach lover, there are plenty of delicious ways to enjoy this sweet fruit.
Consider trying:
- classic peach cobbler
- homemade peach pie
- peach crumble
- peach muffins
- peach coffee cake
- peach bread
- peach cheesecake
- peach and cinnamon desserts
There is something wonderfully versatile about peaches. Their natural sweetness works beautifully in both simple everyday desserts and more elaborate treats.
Final Thoughts
This Old-Fashioned Frozen Peach Crisp is a wonderful reminder that homemade desserts don’t have to be complicated.
You don’t need fresh peaches.
You don’t need special equipment.
And you don’t need hours in the kitchen.
With frozen sliced peaches, a few simple pantry ingredients, and a buttery oat topping, you can create a warm dessert that feels comforting, familiar, and completely homemade.
The peaches become tender and bubbling, the topping turns golden and crisp, and the combination of cinnamon, vanilla, brown sugar, and butter fills the kitchen with an irresistible aroma.
It’s the kind of dessert that’s perfect for a family dinner, a quiet weekend afternoon, or whenever you’re simply craving something sweet and cozy.
Simple ingredients. Easy preparation. Warm peaches. Buttery oats.
That’s the beauty of an old-fashioned fruit crisp.
Did You Make This Recipe?
If you make this Old-Fashioned Frozen Peach Crisp, I’d love to hear how it turned out!
Leave a comment and share your experience. And if you take a photo of your beautiful peach crisp, consider sharing it on Pinterest so other peach lovers can discover this cozy homemade dessert too.
If you love easy, comforting recipes like this one, don’t forget to subscribe by email so you never miss another homemade recipe!

Welcome to my kitchen!
I’m a passionate home cook and recipe creator who loves turning simple ingredients into delicious, comforting meals that everyone can enjoy. Through this website, I share carefully prepared recipes, practical cooking tips, and easy-to-understand food education to help you feel more confident in the kitchen.
My goal is to make cooking simple, enjoyable, and accessible. Whether you are looking for a quick family dinner, a delicious dessert, healthy meal ideas, or traditional recipes with a modern touch, you’ll find inspiration here.
More Than Just Recipes
I believe that cooking is also a way to learn. That’s why this website is not only about recipes. I also create educational articles about ingredients, cooking techniques, kitchen tips, food preparation, and the stories behind different dishes.
Each article is designed to give you useful knowledge that you can apply in your own kitchen. From understanding how ingredients work together to learning better cooking methods, my aim is to help you become a more confident and creative cook.
My Philosophy
Good food doesn’t always require complicated ingredients or professional equipment. With a little knowledge, patience, and creativity, simple ingredients can become something truly special.
I believe in sharing recipes that are practical, clearly explained, and enjoyable to make. I also love exploring new flavors while appreciating traditional cooking and the recipes passed down through generations.
Thank you for visiting my kitchen and being part of this food-loving community. I hope my recipes and articles inspire you to cook, learn, experiment, and most importantly, enjoy every bite!
Happy cooking!