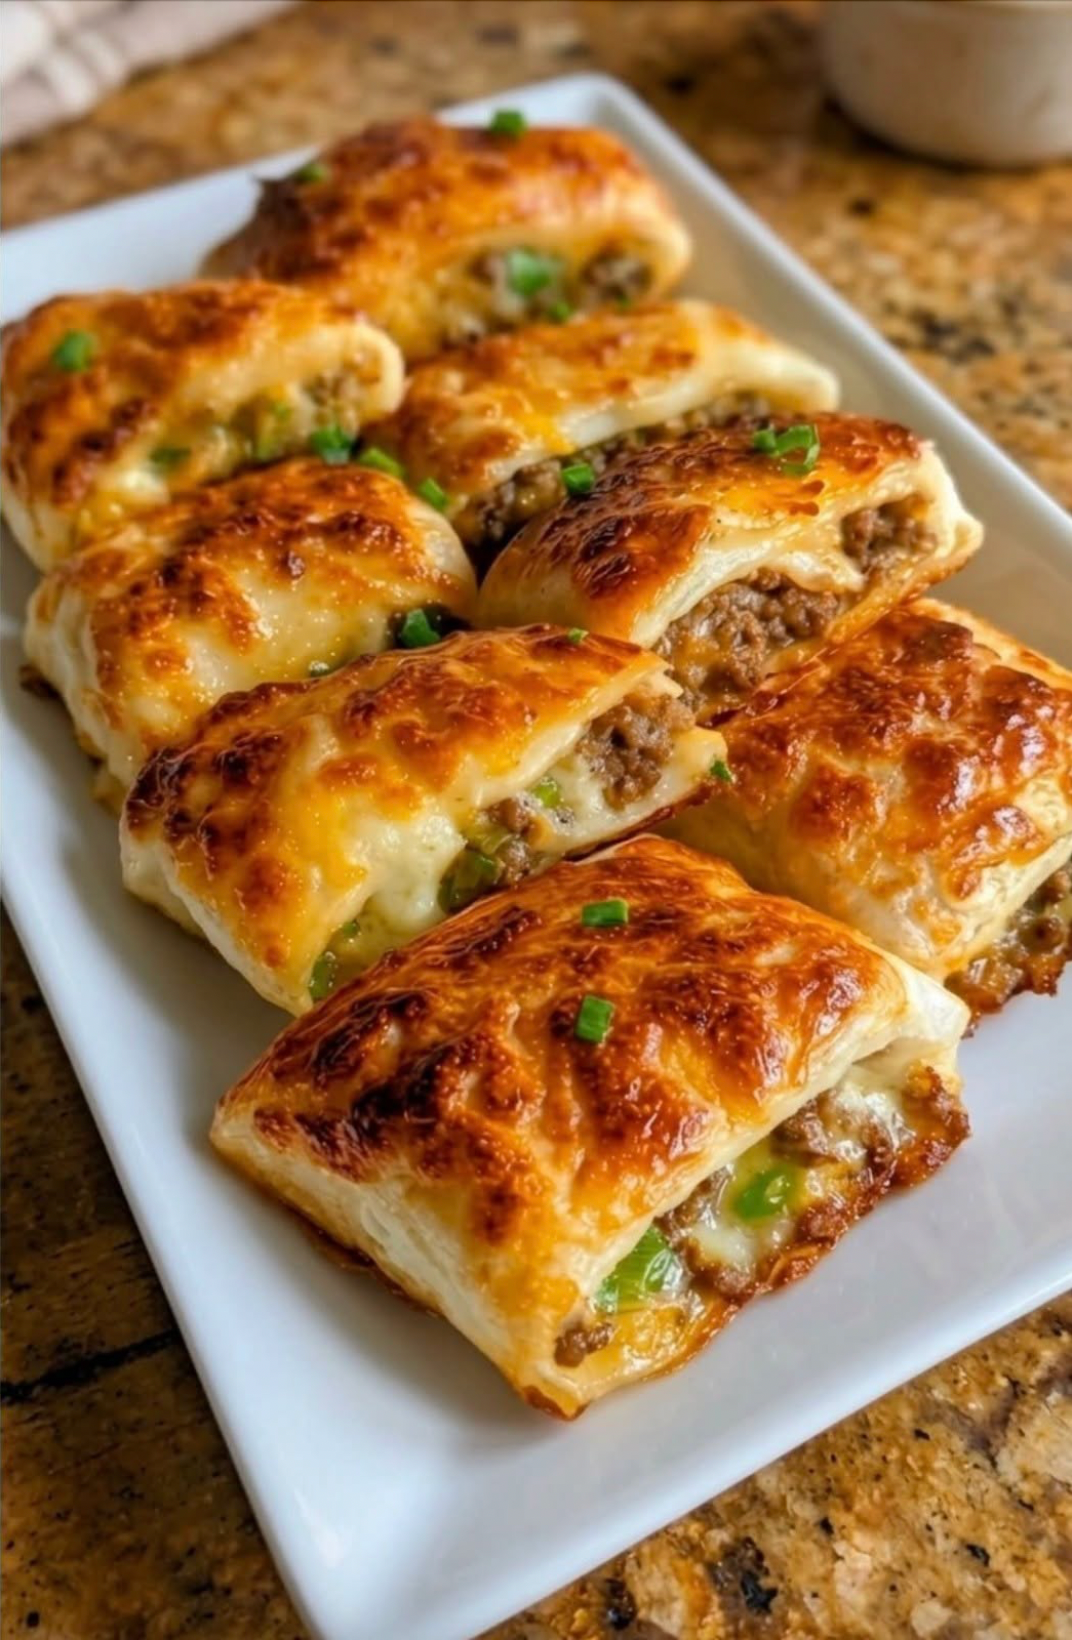
If you’re looking for a meal that’s easy to make, fun to eat, and guaranteed to disappear the moment it hits the table, these Cheesy Beef Taco Pockets are exactly what you need. Imagine seasoned ground beef simmered with classic taco spices, plenty of melted cheese stretching with every bite, and everything wrapped inside a soft dough that bakes into a perfectly golden, flaky pocket. It’s everything you love about taco night, transformed into a portable, mess-free meal that both kids and adults can’t resist.
These delicious pockets combine the bold flavors of traditional tacos with the comforting texture of freshly baked bread. Every bite is filled with juicy, well-seasoned beef, creamy melted cheese, and optional vegetables that add freshness and crunch. Whether served for a busy weeknight dinner, packed into school or work lunches, offered as a game-day snack, or prepared for casual family gatherings, these handheld treats always earn rave reviews.
One of the best things about this recipe is its flexibility. You can customize the filling with different cheeses, vegetables, beans, or even swap the beef for chicken or turkey. Because everything is enclosed inside the dough, they’re easy to eat without the usual taco toppings spilling everywhere, making them perfect for busy families and meal prep alike.
Why You’ll Love This Recipe
These Cheesy Beef Taco Pockets are popular because they are:
- crispy on the outside
- soft and fluffy inside
- loaded with seasoned beef
- filled with gooey melted cheese
- easy to customize
- perfect for meal prepping
- freezer-friendly
- great for lunchboxes
- ideal for parties and game-day gatherings
- family-friendly and kid-approved
Ingredients
For the Filling
- 1 pound (450 g) lean ground beef
- 1 tablespoon olive oil
- 1 small onion, finely diced
- 2 cloves garlic, minced
- 1 packet taco seasoning (or 2 tablespoons homemade taco seasoning)
- ½ cup water
- 1 cup shredded cheddar cheese
- 1 cup shredded Monterey Jack cheese
- ½ cup salsa
- ¼ cup diced green chilies (optional)
- ¼ cup chopped fresh cilantro (optional)
For the Dough
Choose one of the following:
- 1 package refrigerated pizza dough
- refrigerated crescent roll dough
- homemade pizza dough
- homemade bread dough
For Brushing
- 1 egg
- 1 tablespoon water
Whisk together to create an egg wash.
Optional Toppings
- sesame seeds
- everything bagel seasoning
- shredded cheese
- chopped parsley
- melted butter
Making the Beef Filling
Heat olive oil in a large skillet over medium heat.
Add the diced onion and cook until soft and translucent, about 4 to 5 minutes.
Stir in the garlic and cook for another 30 seconds until fragrant.
Add the ground beef.
Break it into small crumbles using a wooden spoon.
Cook until fully browned.
Drain any excess grease.
Sprinkle the taco seasoning evenly over the meat.
Pour in the water and stir well.
Allow the mixture to simmer for about 5 minutes until the sauce thickens and coats the beef.
Remove from the heat.
Stir in the salsa and allow the filling to cool slightly before adding the cheese. This helps prevent the cheese from melting too early and keeps the filling creamy.
Fold in the shredded cheddar and Monterey Jack cheeses until evenly combined.
Preparing the Dough
Lightly flour your work surface.
Roll the dough into a large rectangle approximately ¼ inch thick.
Using a knife or pizza cutter, divide the dough into evenly sized rectangles or squares.
Each piece should be large enough to fold over the filling and seal securely.
Filling the Taco Pockets
Place a generous spoonful of the beef mixture in the center of each dough square.
Avoid overfilling, as this can make sealing difficult and may cause the filling to leak during baking.
Leave about half an inch of space around the edges.
Fold the dough over the filling to create a pocket.
Press the edges together firmly with your fingers.
Use the tines of a fork to crimp the edges, creating a decorative seal while helping prevent the filling from escaping.
Brushing for a Golden Finish
Arrange the pockets on a parchment-lined baking sheet.
Brush each one with the egg wash.
This step helps create a beautifully shiny, golden-brown crust.
If desired, sprinkle the tops with sesame seeds, everything bagel seasoning, or a little extra shredded cheese.
Baking Instructions
Preheat the oven to 400°F (200°C).
Bake the taco pockets for 18 to 22 minutes, or until they are puffed, deeply golden, and the cheese inside is melted and bubbling.
If using homemade dough, baking time may vary slightly depending on its thickness.
Remove the pockets from the oven and allow them to cool for about 5 minutes before serving. The filling will be extremely hot immediately after baking.
Delicious Dipping Sauces
These cheesy pockets are even better served with a variety of dipping sauces.
Popular choices include:
- salsa
- sour cream
- guacamole
- queso dip
- chipotle ranch
- avocado crema
- spicy mayonnaise
- cilantro lime sauce
- pico de gallo
Offering several sauces lets everyone customize each bite.
Easy Variations
Spicy Taco Pockets
Add:
- diced jalapeños
- crushed red pepper flakes
- pepper Jack cheese
- hot salsa
Chicken Taco Pockets
Replace the ground beef with:
- shredded rotisserie chicken
- cooked diced chicken breast
Season with taco seasoning as directed.
Turkey Taco Pockets
Ground turkey makes a lighter version while still delivering plenty of flavor.
Vegetarian Taco Pockets
Replace the meat with a hearty mixture of:
- black beans
- pinto beans
- corn
- sautéed bell peppers
- onions
- mushrooms
Add extra cheese for richness.
Supreme Taco Pockets
Mix into the filling:
- black olives
- diced tomatoes
- green onions
- corn
- cream cheese
This creates an extra creamy, loaded filling.
Best Cheese Combinations
Although cheddar is the classic choice, combining cheeses creates a richer flavor and better melt.
Excellent options include:
- sharp cheddar
- Monterey Jack
- Colby Jack
- mozzarella
- pepper Jack
- Oaxaca cheese
- Mexican cheese blend
Freshly shredded cheese generally melts more smoothly than pre-shredded varieties.
What to Serve with Cheesy Beef Taco Pockets
Complete the meal with:
- Mexican rice
- cilantro lime rice
- refried beans
- black beans
- corn salad
- tortilla chips
- fresh guacamole
- coleslaw
- garden salad
- roasted vegetables
Storage
Allow leftovers to cool completely.
Store them in an airtight container in the refrigerator for up to 4 days.
Freezing Instructions
These taco pockets freeze exceptionally well.
Arrange cooled pockets in a single layer on a baking sheet until frozen.
Transfer them to freezer-safe bags or containers.
Store for up to 3 months.
Reheating
For the crispiest texture:
Reheat in a 350°F (175°C) oven for 10 to 15 minutes.
An air fryer also works well, producing a crisp exterior in just a few minutes.
Microwaving is convenient but may soften the crust.
Tips for Perfect Taco Pockets
- Let the filling cool slightly before assembling.
- Don’t overfill the dough.
- Seal the edges tightly.
- Brush generously with egg wash.
- Use freshly shredded cheese for the smoothest melt.
- Bake until deeply golden rather than lightly browned.
- Allow the pockets to cool for a few minutes before serving.
Frequently Asked Questions
Can I make these ahead of time?
Yes. Assemble the pockets, place them on a baking sheet, cover, and refrigerate for up to 24 hours before baking. Brush with the egg wash just before they go into the oven.
Can I use leftover taco meat?
Absolutely. Leftover seasoned taco meat works perfectly and makes this recipe even quicker to prepare.
Can I cook these in an air fryer?
Yes. Air fry at 375°F (190°C) for about 10 to 12 minutes, or until the dough is golden and cooked through. Cooking times may vary depending on your air fryer.
Can I use homemade dough?
Definitely. Homemade pizza or bread dough creates an even more rustic and flavorful pocket.
How do I keep the filling from leaking?
Avoid overfilling, leave a border around the edges, press the seams firmly together, and crimp with a fork to create a secure seal.

Welcome to my kitchen!
I’m a passionate home cook and recipe creator who loves turning simple ingredients into delicious, comforting meals that everyone can enjoy. Through this website, I share carefully prepared recipes, practical cooking tips, and easy-to-understand food education to help you feel more confident in the kitchen.
My goal is to make cooking simple, enjoyable, and accessible. Whether you are looking for a quick family dinner, a delicious dessert, healthy meal ideas, or traditional recipes with a modern touch, you’ll find inspiration here.
More Than Just Recipes
I believe that cooking is also a way to learn. That’s why this website is not only about recipes. I also create educational articles about ingredients, cooking techniques, kitchen tips, food preparation, and the stories behind different dishes.
Each article is designed to give you useful knowledge that you can apply in your own kitchen. From understanding how ingredients work together to learning better cooking methods, my aim is to help you become a more confident and creative cook.
My Philosophy
Good food doesn’t always require complicated ingredients or professional equipment. With a little knowledge, patience, and creativity, simple ingredients can become something truly special.
I believe in sharing recipes that are practical, clearly explained, and enjoyable to make. I also love exploring new flavors while appreciating traditional cooking and the recipes passed down through generations.
Thank you for visiting my kitchen and being part of this food-loving community. I hope my recipes and articles inspire you to cook, learn, experiment, and most importantly, enjoy every bite!
Happy cooking!