When done right, these biscuits are soft on the inside, lightly crisp on the outside, and layered so delicately that they practically pull apart on their own. Each bite melts slightly on the tongue, carrying the rich flavor of butter with a gentle, comforting warmth.
Why These Biscuits Are So Special
What makes classic buttery biscuits stand out is not just taste, but texture. The goal is a biscuit that is:
- Light and airy, not dense or heavy
- Flaky, with visible layers that separate beautifully
- Buttery, without feeling greasy
- Tender, with a soft crumb that melts in your mouth
The magic lies in how cold butter interacts with flour and heat. As the biscuits bake, the butter melts and releases steam, creating those signature layers and lift.
Ingredients (Makes 8–10 biscuits)
- 2 cups all-purpose flour
- 1 tablespoon baking powder
- 1 teaspoon salt
- 1–2 teaspoons sugar (optional, for slight balance)
- ½ cup cold unsalted butter (very cold, cut into cubes)
- ¾ cup cold milk or buttermilk (buttermilk gives extra tenderness)
Understanding the Ingredients
Each ingredient plays an important role:
- Flour provides structure
- Baking powder creates lift and fluffiness
- Salt enhances flavor and balances richness
- Butter creates flakiness and richness
- Cold liquid binds everything without melting the butter too early
The temperature of the ingredients is crucial. Cold butter is what creates the flaky texture—if it melts too soon, the biscuits become dense instead of airy.
Step-by-Step Preparation
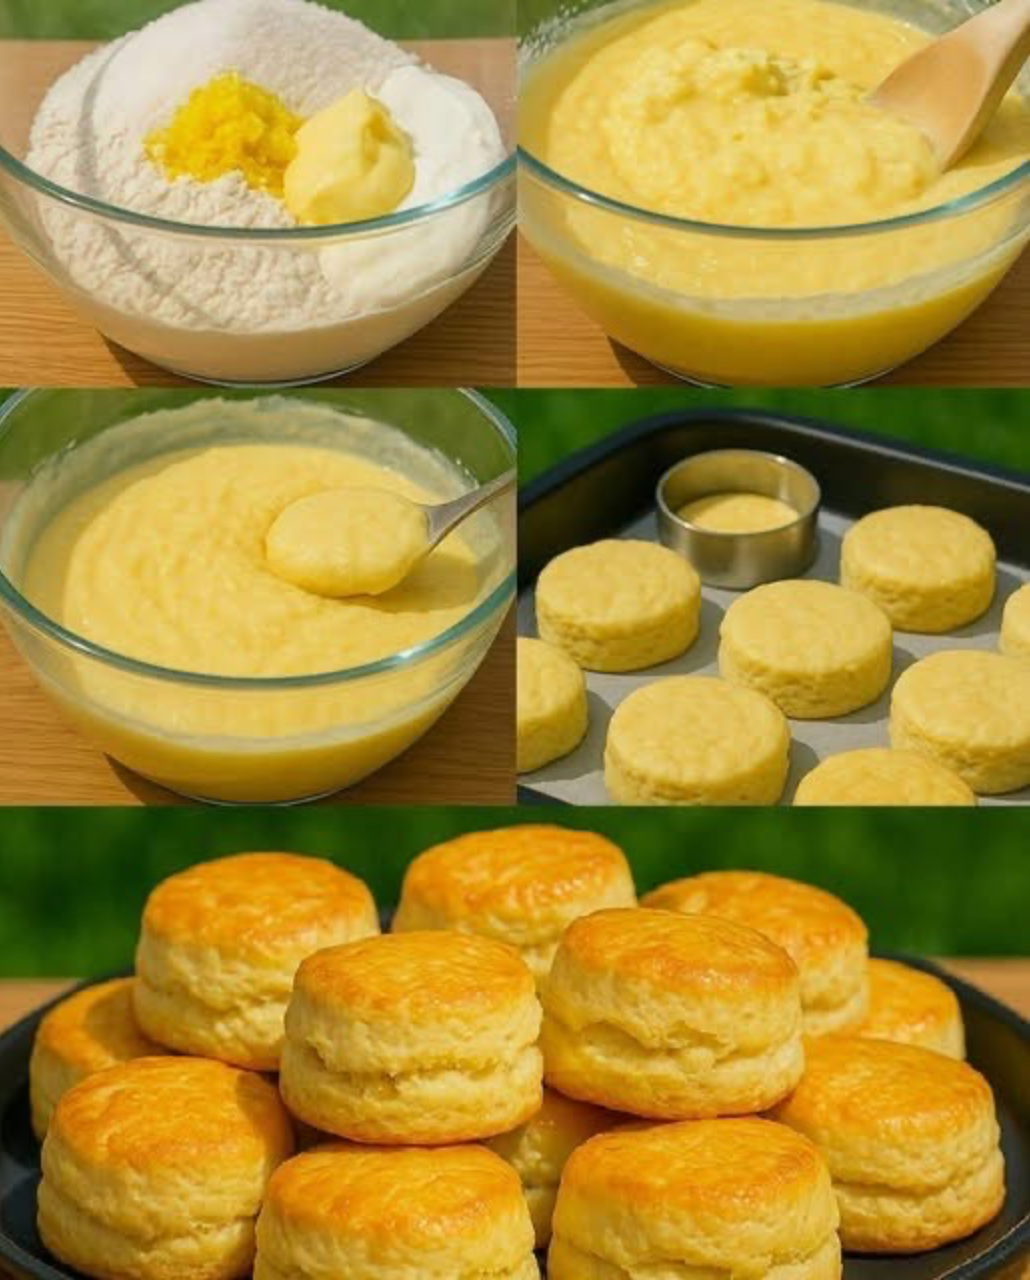
Step 1: Prepare the Dry Mixture
In a large bowl, combine flour, baking powder, salt, and sugar (if using).
Whisk everything together thoroughly so the leavening agent is evenly distributed. This ensures the biscuits rise evenly during baking.
Step 2: Cut in the Butter
Add the cold butter cubes into the flour mixture.
Using a pastry cutter, fork, or your fingertips, gently work the butter into the flour until the mixture resembles coarse crumbs with small pea-sized pieces of butter still visible.
This step is essential. Those small butter pockets are what create the flaky layers later.
Step 3: Add the Cold Milk
Pour in the cold milk or buttermilk gradually.
Stir gently with a spoon or spatula until the dough just begins to come together. Do not overmix—the dough should look slightly rough and shaggy, not smooth.
Overmixing develops gluten and makes biscuits tough instead of tender.
Step 4: Shape the Dough
Turn the dough onto a lightly floured surface.
Gently bring it together with your hands, pressing it into a rectangle. Fold it over itself 2–3 times. This folding process creates extra layers inside the biscuit.
Press the dough to about 1–1.5 cm thickness.
Step 5: Cut the Biscuits
Use a round cutter or glass to cut straight down into the dough.
Do not twist the cutter—twisting seals the edges and prevents proper rising.
Gather scraps gently and repeat until all dough is used.
Step 6: Bake to Golden Perfection
Place biscuits on a baking tray, slightly touching each other for soft sides or spaced apart for crisp edges.
Bake in a preheated oven at 200°C (400°F) for about 12–15 minutes, or until the tops are golden brown and the edges are lightly crisp.
What Happens in the Oven
As the biscuits bake, a quiet transformation takes place:
- Cold butter melts and releases steam
- Steam pushes through the dough, creating lift
- Layers separate and expand
- The exterior turns golden and slightly crisp
- The inside remains soft, fluffy, and warm
It is a simple chemical reaction, but the result feels almost magical.
Texture and Flavor Experience
A perfect buttery biscuit delivers:
- A crisp, golden exterior
- A soft, airy, layered interior
- A rich, buttery aroma
- A slightly salty, comforting flavor
They are simple, but deeply satisfying.
Serving Ideas
Classic buttery biscuits are incredibly versatile. They can be enjoyed in many ways:
- Warm with butter and honey
- With jam or fruit preserves
- Alongside soups or stews
- As a base for breakfast sandwiches
- With gravy for a hearty meal
- Or simply on their own, fresh from the oven
Tips for Perfect Biscuits
- Keep everything cold—especially butter and milk
- Do not overmix the dough
- Handle the dough as little as possible
- Use a hot oven for proper rise
- Place biscuits close together for softer sides
Variations to Try
Once you master the classic version, you can easily experiment:
Cheese Biscuits
Add shredded cheddar for a savory twist.
Garlic Herb Biscuits
Mix in garlic powder, parsley, or rosemary.
Sweet Biscuits
Increase sugar slightly and serve with fruit or cream.
Buttermilk Upgrade
Use buttermilk for extra tenderness and subtle tang.
Make-Ahead and Storage
- Dough can be prepared ahead and refrigerated
- Baked biscuits stay fresh for 1–2 days
- Reheat gently in the oven to restore softness
- Freeze baked biscuits and warm before serving
There is something deeply comforting about a tray of freshly baked biscuits coming out of the oven. The smell alone—warm butter, toasted flour, and a hint of sweetness—feels like home in its purest form. Classic buttery biscuits are one of those timeless recipes that don’t rely on complexity or fancy techniques. Instead, they celebrate simplicity, patience, and a few well-chosen ingredients coming together in perfect harmony.
When done right, these biscuits are soft on the inside, lightly crisp on the outside, and layered so delicately that they practically pull apart on their own. Each bite melts slightly on the tongue, carrying the rich flavor of butter with a gentle, comforting warmth.
Why These Biscuits Are So Special
What makes classic buttery biscuits stand out is not just taste, but texture. The goal is a biscuit that is:
- Light and airy, not dense or heavy
- Flaky, with visible layers that separate beautifully
- Buttery, without feeling greasy
- Tender, with a soft crumb that melts in your mouth
The magic lies in how cold butter interacts with flour and heat. As the biscuits bake, the butter melts and releases steam, creating those signature layers and lift.
Ingredients (Makes 8–10 biscuits)
- 2 cups all-purpose flour
- 1 tablespoon baking powder
- 1 teaspoon salt
- 1–2 teaspoons sugar (optional, for slight balance)
- ½ cup cold unsalted butter (very cold, cut into cubes)
- ¾ cup cold milk or buttermilk (buttermilk gives extra tenderness)
Understanding the Ingredients
Each ingredient plays an important role:
- Flour provides structure
- Baking powder creates lift and fluffiness
- Salt enhances flavor and balances richness
- Butter creates flakiness and richness
- Cold liquid binds everything without melting the butter too early
The temperature of the ingredients is crucial. Cold butter is what creates the flaky texture—if it melts too soon, the biscuits become dense instead of airy.
Step-by-Step Preparation
Step 1: Prepare the Dry Mixture
In a large bowl, combine flour, baking powder, salt, and sugar (if using).
Whisk everything together thoroughly so the leavening agent is evenly distributed. This ensures the biscuits rise evenly during baking.
Step 2: Cut in the Butter
Add the cold butter cubes into the flour mixture.
Using a pastry cutter, fork, or your fingertips, gently work the butter into the flour until the mixture resembles coarse crumbs with small pea-sized pieces of butter still visible.
This step is essential. Those small butter pockets are what create the flaky layers later.
Step 3: Add the Cold Milk
Pour in the cold milk or buttermilk gradually.
Stir gently with a spoon or spatula until the dough just begins to come together. Do not overmix—the dough should look slightly rough and shaggy, not smooth.
Overmixing develops gluten and makes biscuits tough instead of tender.
Step 4: Shape the Dough
Turn the dough onto a lightly floured surface.
Gently bring it together with your hands, pressing it into a rectangle. Fold it over itself 2–3 times. This folding process creates extra layers inside the biscuit.
Press the dough to about 1–1.5 cm thickness.
Step 5: Cut the Biscuits
Use a round cutter or glass to cut straight down into the dough.
Do not twist the cutter—twisting seals the edges and prevents proper rising.
Gather scraps gently and repeat until all dough is used.
Step 6: Bake to Golden Perfection
Place biscuits on a baking tray, slightly touching each other for soft sides or spaced apart for crisp edges.
Bake in a preheated oven at 200°C (400°F) for about 12–15 minutes, or until the tops are golden brown and the edges are lightly crisp.
What Happens in the Oven
As the biscuits bake, a quiet transformation takes place:
- Cold butter melts and releases steam
- Steam pushes through the dough, creating lift
- Layers separate and expand
- The exterior turns golden and slightly crisp
- The inside remains soft, fluffy, and warm
It is a simple chemical reaction, but the result feels almost magical.
Texture and Flavor Experience
A perfect buttery biscuit delivers:
- A crisp, golden exterior
- A soft, airy, layered interior
- A rich, buttery aroma
- A slightly salty, comforting flavor
They are simple, but deeply satisfying.
Serving Ideas
Classic buttery biscuits are incredibly versatile. They can be enjoyed in many ways:
- Warm with butter and honey
- With jam or fruit preserves
- Alongside soups or stews
- As a base for breakfast sandwiches
- With gravy for a hearty meal
- Or simply on their own, fresh from the oven
Tips for Perfect Biscuits
- Keep everything cold—especially butter and milk
- Do not overmix the dough
- Handle the dough as little as possible
- Use a hot oven for proper rise
- Place biscuits close together for softer sides
Variations to Try
Once you master the classic version, you can easily experiment:
Cheese Biscuits
Add shredded cheddar for a savory twist.
Garlic Herb Biscuits
Mix in garlic powder, parsley, or rosemary.
Sweet Biscuits
Increase sugar slightly and serve with fruit or cream.
Buttermilk Upgrade
Use buttermilk for extra tenderness and subtle tang.
Make-Ahead and Storage
- Dough can be prepared ahead and refrigerated
- Baked biscuits stay fresh for 1–2 days
- Reheat gently in the oven to restore softness
- Freeze baked biscuits and warm before serving