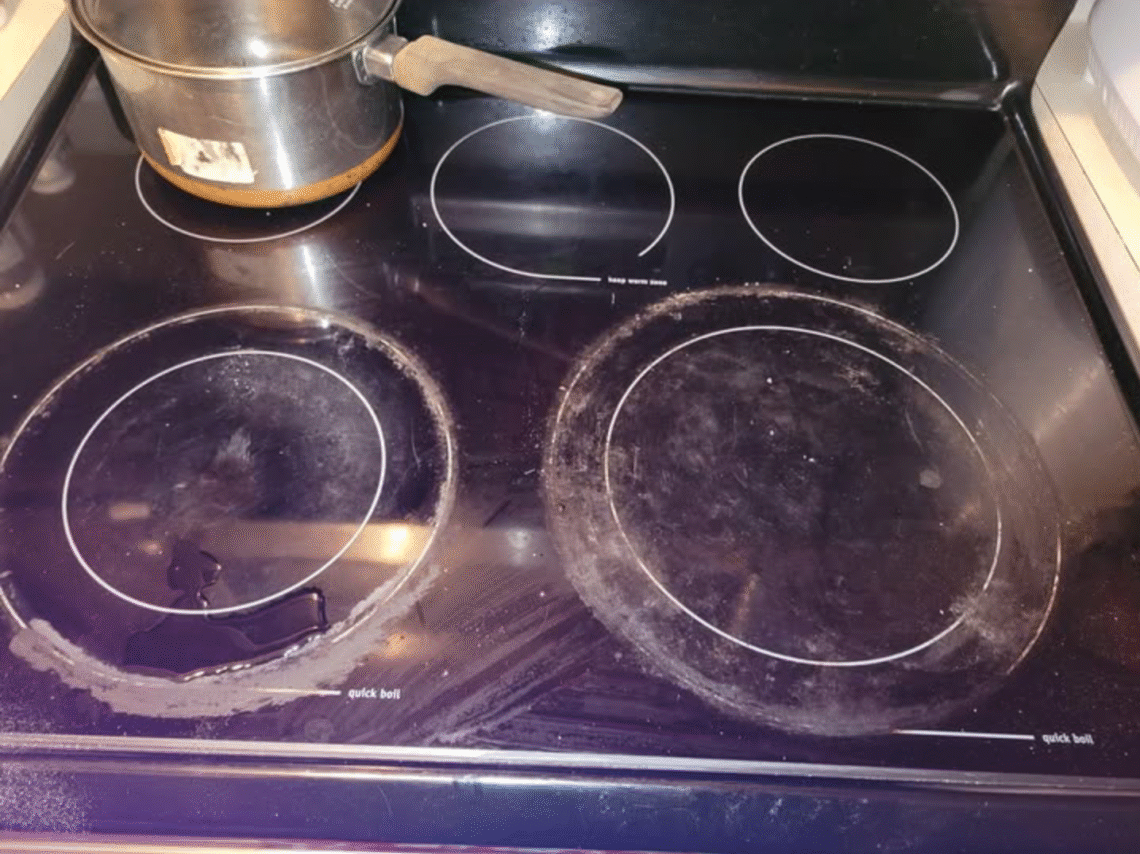
Glass-top electric stoves have an undeniable appeal: their sleek, minimalist design elevates the look of any kitchen; their precise temperature control makes cooking both a science and an art; and their relative affordability keeps them popular in households across the globe. But as beautiful as they are, these cooktops can be… delicate.
A single spill of sugar, tomato sauce, or milk can leave a stubborn residue. Boil-overs caramelize, splatters harden, and even when you diligently wipe after every meal, a dull haze or ghostly streaks can linger, silently reminding you that “clean” is not the same as “sparkling.”
Fear not. With the right approach, patience, and a few gentle, natural tools, your glass stovetop can be restored to its original gleaming beauty—without harsh chemicals, without heavy scrubbing, and without risking scratches.
Understanding Why Glass Stovetops Get Dull
Before diving into the cleaning process, it helps to understand what causes the stubborn stains:
Caramelized Sugars: Sugar and syrups are the ultimate enemies of glass. When they boil over, they can fuse with the surface, creating a brown, sticky film.
Mineral Deposits: Water used for boiling can leave behind mineral spots, particularly in areas with hard water. Over time, these spots form a milky haze.
Grease Build-Up: Oils from sautéing, frying, or roasting cling to the surface, often invisibly at first, but over time, they create a smudgy film that diminishes shine.
Scratches and Abrasions: Using rough sponges, steel wool, or sharp tools damages the surface and traps dirt in micro-grooves, which contributes to a perpetually dull look.
Understanding the culprit helps you tackle it correctly—and avoid mistakes that make the problem worse.
Step 1: Gather Your Materials
You don’t need specialized chemicals to restore your stovetop. These gentle, accessible items are enough:
White vinegar (acts as a natural degreaser and mineral remover)
Baking soda (a gentle abrasive that lifts stains without scratching)
Microfiber cloths (soft, lint-free, and perfect for polishing)
Plastic scraper or old credit card (to lift hardened spills safely)
Spray bottle (for easy application of vinegar or water)
Warm water
Optional: a few drops of mild dish soap for greasy spots.
Step 2: Remove Loose Debris
Before you get to the tough stains, remove any loose crumbs, dust, or debris. Use a soft cloth or paper towel. Avoid sweeping with anything abrasive—glass scratches easily.
Tip: Always wait until the stovetop is completely cool before cleaning. Attempting to remove residue on a hot surface can cause burns or damage the glass.
Step 3: Tackle Hardened, Burnt-On Residue
For stubborn caramelized spills:
Dampen a cloth with warm water and place it over the burnt area for 5–10 minutes. This softens the residue.
Use a plastic scraper or old credit card at a 30–45 degree angle to gently lift the softened spill.
Avoid metal scrapers—they can scratch the glass irreversibly.
Pro tip: If the residue resists, sprinkle baking soda lightly over it, then add a few drops of warm water to make a paste. Let it sit for 10–15 minutes to break down the stubborn material.
Step 4: Degrease and Remove Mineral Deposits
Even after scraping, your stovetop may have grease films or water spots. Here’s how to restore shine naturally:
Spray white vinegar over the entire surface. The vinegar reacts with mineral deposits and grease, helping to lift and dissolve them.
Let the vinegar sit for 5–10 minutes. For heavier stains, gently sprinkle baking soda on top of the vinegar, forming a fizzing reaction that loosens grime.
Wipe the area with a soft microfiber cloth, using circular motions to polish and remove residues.
Optional: For extra shine, dampen a second cloth with warm water and buff the surface after the vinegar treatment.
Step 5: Polish for Mirror-Like Finish
Once stains are gone, your stovetop may look clean, but it may still lack sparkle. Polishing it enhances the glossy effect:
Dry the surface thoroughly with a clean microfiber cloth.
Buff in small, circular motions, paying attention to edges and corners.
Optional: Use a few drops of olive oil or a commercial glass stovetop polish to enhance shine. Apply sparingly and buff immediately.
The result? A stovetop that reflects light, repels fingerprints, and looks as close to new as possible.
Step 6: Daily Maintenance Tips
Keeping your stovetop sparkling long-term is easier than you think:
Wipe after every use: Even a quick swipe with a damp cloth prevents build-up.
Use spill guards or lids: When boiling or frying, a lid can prevent splatters from landing on the glass.
Avoid harsh chemicals: Bleach, ammonia, and abrasive powders can dull the surface permanently.
Use only soft cloths or sponges: Microfiber is ideal; steel wool and scrubbing pads scratch the surface.
Act fast on sugar and syrup spills: Hardened caramel is much harder to remove than fresh spills.
Step 7: Handling Persistent Stains
Some stains may resist even careful cleaning. Here’s how to handle the toughest cases:
Baking Soda and Hydrogen Peroxide Paste: Mix 2 parts baking soda to 1 part hydrogen peroxide. Spread on the stain, let it sit 15–20 minutes, then gently wipe.
Razor Blade Technique (Careful!): If your stovetop manufacturer permits, hold a razor blade at a 45-degree angle and gently scrape residue. Never drag—it should slice, not scratch.
Repeat Gentle Vinegar Treatment: Stubborn mineral deposits sometimes need 2–3 applications. Patience wins.
Step 8: Restoring That “New Stove” Glow
For a final finishing touch, consider the sensory experience:
Spray a tiny bit of distilled water and polish with a dry cloth to remove streaks.
Step back and notice the reflection of light, the mirror-like surface that makes cooking more joyful.
Appreciate that this is not just cleaning—it’s restoring your kitchen to a space of care, beauty, and pride.
Step 9: Common Mistakes to Avoid
Scrubbing too hard: Glass scratches easily. Gentle pressure works wonders.
Using ammonia or bleach: These chemicals can etch the surface over time.
Ignoring spills: Overnight residue is much harder to remove than fresh spills.
Metal tools: Avoid knives, forks, or metal scrubbers. Plastic scrapers work fine.
Step 10: The Psychological Benefits of a Clean Stove
A sparkling glass stovetop is more than aesthetics:
Reduces stress: A clean, reflective surface makes cooking feel more controlled and pleasant.
Encourages healthy cooking: When the kitchen feels cared for, you’re more likely to cook at home.
Boosts confidence: Guests notice gleaming countertops and stoves—it’s a subtle marker of pride and care.
Extends appliance life: Regular cleaning prevents burn marks and permanent discoloration.
Step 11: Advanced Tips and Hacks
Steam Softening Hack: Place a wet cloth over the spill and microwave for 20–30 seconds (if safe). Heat softens the residue without scrubbing.
Citrus Twist: Lemon juice works like vinegar for mineral deposits and leaves a fresh scent.
Eco-Friendly Approach: Baking soda and vinegar are non-toxic and safe for households with kids and pets.
Polish with Coffee Filters: They’re lint-free and leave no streaks, perfect for buffing glass.
Step 12: Long-Term Care Plan
Make a weekly or bi-weekly ritual of:
Light wipe-down with warm water and microfiber cloth.
Spot treat any new spills immediately.
Polish with vinegar or a gentle glass stovetop cleaner.
This routine prevents stubborn build-up, keeps your stovetop reflective, and turns maintenance into a relaxing ritual rather than a chore.
Final Reflection
Restoring your glass stovetop is not just about appearance—it’s about respecting your kitchen, your cooking, and your own time. With simple ingredients, gentle tools, and a patient approach, you can:
Remove years of stubborn residue.
Restore that mirror-like shine that makes cooking more enjoyable.
Avoid harsh chemicals, odors, and unnecessary elbow grease.
Take pride in a surface that reflects both light and care.
A glass stovetop is more than a cooking surface—it’s a canvas for culinary creation, a centerpiece of your kitchen, and a subtle signal that even small acts of care transform your daily life.
Your stovetop is waiting. All it asks is a little time, a few gentle touches, and the patience to let vinegar, baking soda, and warmth do their quiet magic. In return, it gives back brilliance, pride, and a gleaming stage for every meal you create.