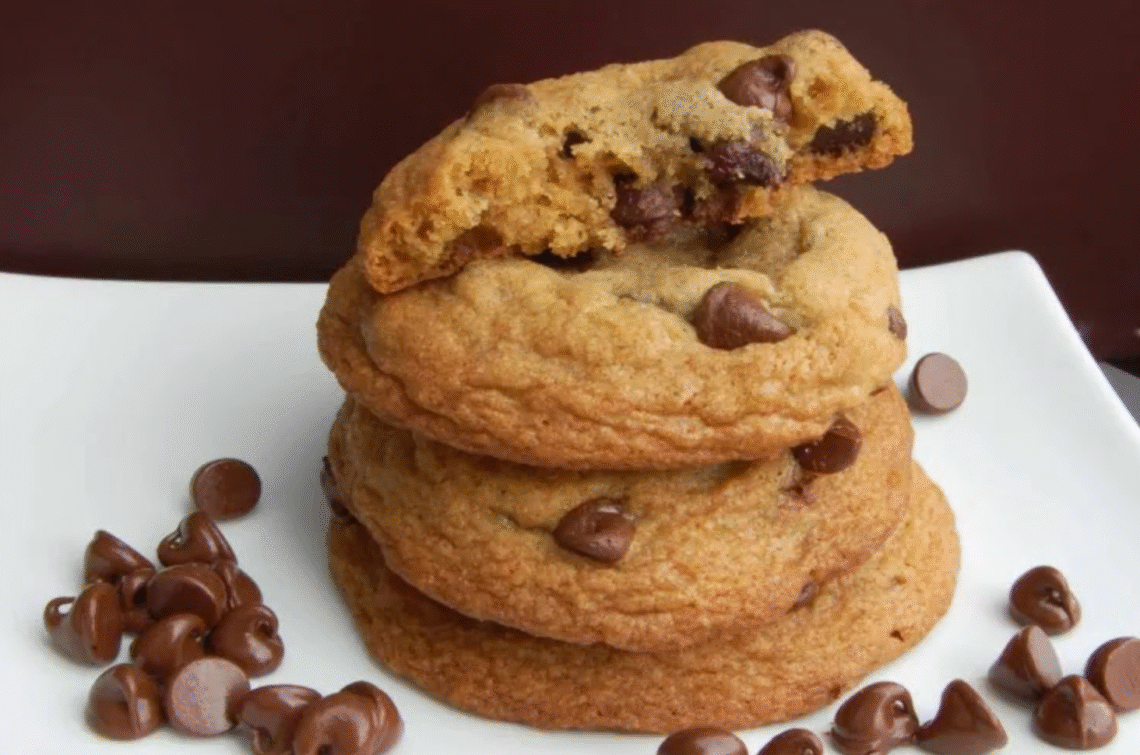
There’s something almost magical about a perfect chocolate chip cookie.
The way it balances soft, buttery centers with slightly crisp, golden edges — the rich scent of vanilla and caramelized sugar filling your kitchen — and that first warm bite where melted chocolate mingles with chewy dough.
This recipe is everything a chocolate chip cookie should be: chewy in the middle, lightly crisp around the edges, full of rich flavor, and absolutely irresistible whether eaten warm from the oven or cooled to perfection.
It’s a timeless favorite for good reason — and with the right method, you can recreate that bakery-style texture every time, right in your own kitchen.
Ingredients (Makes 24–28 medium cookies)
- 2 ¼ cups (280 g) all-purpose flour
- 1 teaspoon baking soda
- ½ teaspoon baking powder
- ¾ teaspoon fine salt
- ¾ cup (170 g) unsalted butter, melted and cooled slightly
- ¾ cup (150 g) packed brown sugar (light or dark)
- ½ cup (100 g) granulated sugar
- 1 large egg + 1 egg yolk, at room temperature
- 2 teaspoons pure vanilla extract
- 1 ½ cups (270 g) semi-sweet chocolate chips or chunks
- Optional: ½ cup chopped toasted walnuts or pecans (for extra texture)
- Optional finishing touch: flakes of sea salt for sprinkling before baking
Why These Ingredients Work
- Butter gives richness and helps create that chewy center. Melting it (instead of creaming it cold) creates denser, chewier cookies rather than fluffy ones.
- Brown sugar adds moisture and a hint of molasses, which deepens flavor and chewiness.
- Granulated sugar helps the edges caramelize and turn beautifully golden.
- Egg yolk adds extra fat for tenderness and that bakery-style chew.
- Vanilla enhances the flavor of the chocolate and brings warmth to the dough.
- Chocolate chips or chunks melt into creamy pockets, balancing the sweetness of the dough.
Equipment Needed
- Two mixing bowls (one large, one medium)
- Whisk and rubber spatula or wooden spoon
- Measuring cups and spoons
- Baking sheet lined with parchment paper or a silicone baking mat
- Cooling rack
- Cookie scoop or tablespoon
Instructions
Step 1: Prepare the Dry Ingredients
In a medium bowl, whisk together the flour, baking soda, baking powder, and salt until well combined.
This ensures that the leavening agents (baking soda and powder) are evenly distributed, preventing uneven rising during baking.
Set this mixture aside.
Step 2: Melt and Cool the Butter
In a small saucepan or microwave-safe bowl, melt the butter gently until just liquid — do not let it brown unless you want a deeper, nutty flavor.
Allow it to cool for about 5–7 minutes before using; it should be warm to the touch but not hot.
Melted butter, as opposed to creamed, gives the cookies that signature dense and chewy texture instead of being airy.
Step 3: Mix the Wet Ingredients
In a large mixing bowl, combine the melted butter, brown sugar, and granulated sugar.
Whisk vigorously for about 1–2 minutes until the mixture looks glossy and slightly thickened.
This step helps dissolve the sugar crystals and gives the dough its soft texture.
Add the egg, egg yolk, and vanilla extract.
Whisk again until the mixture becomes smooth, cohesive, and slightly lighter in color — almost like a caramel sauce.
This step is crucial: the extra egg yolk adds richness and structure, keeping the cookies moist.
Step 4: Combine Wet and Dry Mixtures
Add the dry ingredient mixture (from Step 1) to the wet ingredients in two additions, stirring gently with a rubber spatula until just incorporated.
Do not overmix — once the flour disappears, stop stirring. Overmixing can make cookies tough because it develops too much gluten.
At this stage, the dough will be thick, soft, and slightly sticky.
Step 5: Add the Chocolate
Fold in the chocolate chips or chunks, making sure they’re evenly distributed throughout the dough.
You can use any combination you like — semi-sweet, milk chocolate, or even chopped dark chocolate bars. Using chunks instead of chips creates beautiful pools of melted chocolate throughout the cookie.
If desired, fold in nuts for a toasty crunch that contrasts beautifully with the gooey chocolate.
Step 6: Chill the Dough
Cover the bowl with plastic wrap and refrigerate for at least 30 minutes, or up to 24 hours.
This is one of the most important steps if you want deep flavor and the perfect texture.
During chilling:
- The butter solidifies, preventing cookies from spreading too thin.
- The flour absorbs the moisture, creating a richer flavor and chewier bite.
- The sugars slightly crystallize, adding those perfect golden, caramelized edges.
If you skip chilling, your cookies may bake up flatter and less chewy.
Step 7: Preheat and Prepare for Baking
When ready to bake, preheat your oven to 350°F (175°C).
Line two baking sheets with parchment paper or silicone mats.
Using a cookie scoop or tablespoon, portion the dough into 1 ½ tablespoon-sized balls (about 45–50 grams each).
Place them on the baking sheet, spaced about 2 inches apart — they will spread slightly as they bake.
For that bakery look, press a few extra chocolate chips on top of each ball before baking.
Step 8: Bake to Golden Perfection
Bake in the preheated oven for 9 to 11 minutes, depending on size and desired doneness.
You’ll know they’re ready when:
- The edges are lightly golden brown.
- The centers still look slightly underbaked and soft.
That’s key — they’ll continue to cook on the baking sheet from residual heat after you remove them.
Do not overbake, or they’ll lose their chewy center.
Step 9: Cool the Cookies
Remove the baking sheet from the oven and let the cookies rest on the pan for 5 minutes.
Then carefully transfer them to a wire rack to cool completely.
This brief rest period allows the centers to set while keeping the texture soft and tender.
If desired, sprinkle each warm cookie with a pinch of sea salt flakes to enhance the chocolate flavor.
Texture and Flavor Profile
The result is everything you want in a perfect chocolate chip cookie:
- A crisp, slightly caramelized edge that gives way to a soft, buttery middle.
- A chewy, rich interior packed with melting chocolate.
- Balanced sweetness with a deep, toffee-like flavor from brown sugar and vanilla.
When eaten warm, the cookies are soft and gooey, with chocolate that stretches as you pull them apart. Once cooled, they firm up slightly but remain tender inside.
Storage and Make-Ahead Tips
- Room Temperature: Store cooled cookies in an airtight container for up to 5 days. Place a slice of bread in the container to keep them soft — the cookies absorb moisture from the bread.
- Freezer (Dough): Scoop unbaked cookie dough balls onto a tray, freeze until solid, then store in a freezer bag. Bake straight from frozen, adding 1–2 minutes to the baking time.
- Freezer (Baked Cookies): Store baked cookies in an airtight container for up to 2 months. Thaw at room temperature or warm in the oven for a few minutes before serving.
Variations and Add-Ins
- Brown Butter Cookies: Brown the butter until golden and nutty before mixing. This adds a deep, toasted flavor reminiscent of caramel and hazelnuts.
- Salted Chocolate Cookies: Add a pinch of coarse sea salt before baking for an elevated, sophisticated touch.
- Double Chocolate: Replace ¼ cup of flour with cocoa powder and use white or milk chocolate chips.
- Espresso Infusion: Add 1 teaspoon of instant espresso powder to the dough to intensify the chocolate flavor.
- Nut Lovers’ Version: Add toasted pecans, walnuts, or almonds for crunch and contrast.
- Chunky Bakery Style: Use chopped chocolate bars instead of chips for uneven, dramatic pockets of melted chocolate.
Tips for Perfect Results
- Measure your flour correctly. Spoon and level — don’t pack it into the cup. Too much flour leads to cakey cookies.
- Don’t skip chilling. Even 30 minutes makes a big difference in texture and flavor.
- Use good-quality chocolate. The better the chocolate, the more luxurious the taste.
- Bake one tray at a time. This ensures even browning and consistent results.
- Pull them early. Slightly underbaked cookies continue to set as they cool, staying soft for days.
Serving Suggestions
Serve warm with a glass of cold milk, a cup of coffee, or alongside a scoop of vanilla ice cream for an indulgent dessert.
They also make wonderful gifts — pack them in parchment-lined tins or wrap them in cellophane bags tied with ribbon.
These cookies are timeless, comforting, and endlessly adaptable — the kind you’ll bake for family gatherings, rainy afternoons, and late-night cravings. Once you make them this way, you’ll never go back to another recipe.