A mop is one of the most essential tools for keeping your home clean—but ironically, it’s also one of the items that gets the dirtiest the fastest. Over time, what starts as a fresh, absorbent cleaning tool can become heavy, stained, smelly, and ineffective. At that point, many people assume it’s time to throw it away and buy a new one.
But in many cases, that’s not necessary.
With the right method—and just a small amount of a powerful, common household ingredient—you can restore your mop so it looks cleaner, smells fresher, and performs almost like new again.
This is not just about saving money. It’s about understanding what causes the buildup in the first place, and how to break it down effectively.
Why Mops Get So Dirty (Even When You Clean Regularly)
Before fixing the problem, it helps to understand it.
Every time you mop your floors, the fibers absorb:
- Dirt and dust
- Grease and oils
- Cleaning product residue
- Bacteria from surfaces
Even after rinsing, small amounts of these remain trapped deep in the fibers. Over time, this leads to:
- Dark staining
- Bad odors
- Reduced absorbency
- Sticky or stiff texture
The problem isn’t just surface dirt—it’s buildup.
The “Secret” Ingredient: Why It Works
One of the most effective and accessible solutions is white vinegar.
What Makes It Effective
White vinegar contains acetic acid, which helps:
- Break down grease and residue
- Dissolve mineral buildup
- Neutralize odors
- Loosen trapped dirt
It doesn’t just clean the surface—it penetrates the fibers and helps release what’s stuck inside.
Step-by-Step Deep Cleaning Method
This method works for most types of mops, including:
- String mops
- Microfiber mops
- Sponge heads (with slight adjustments)
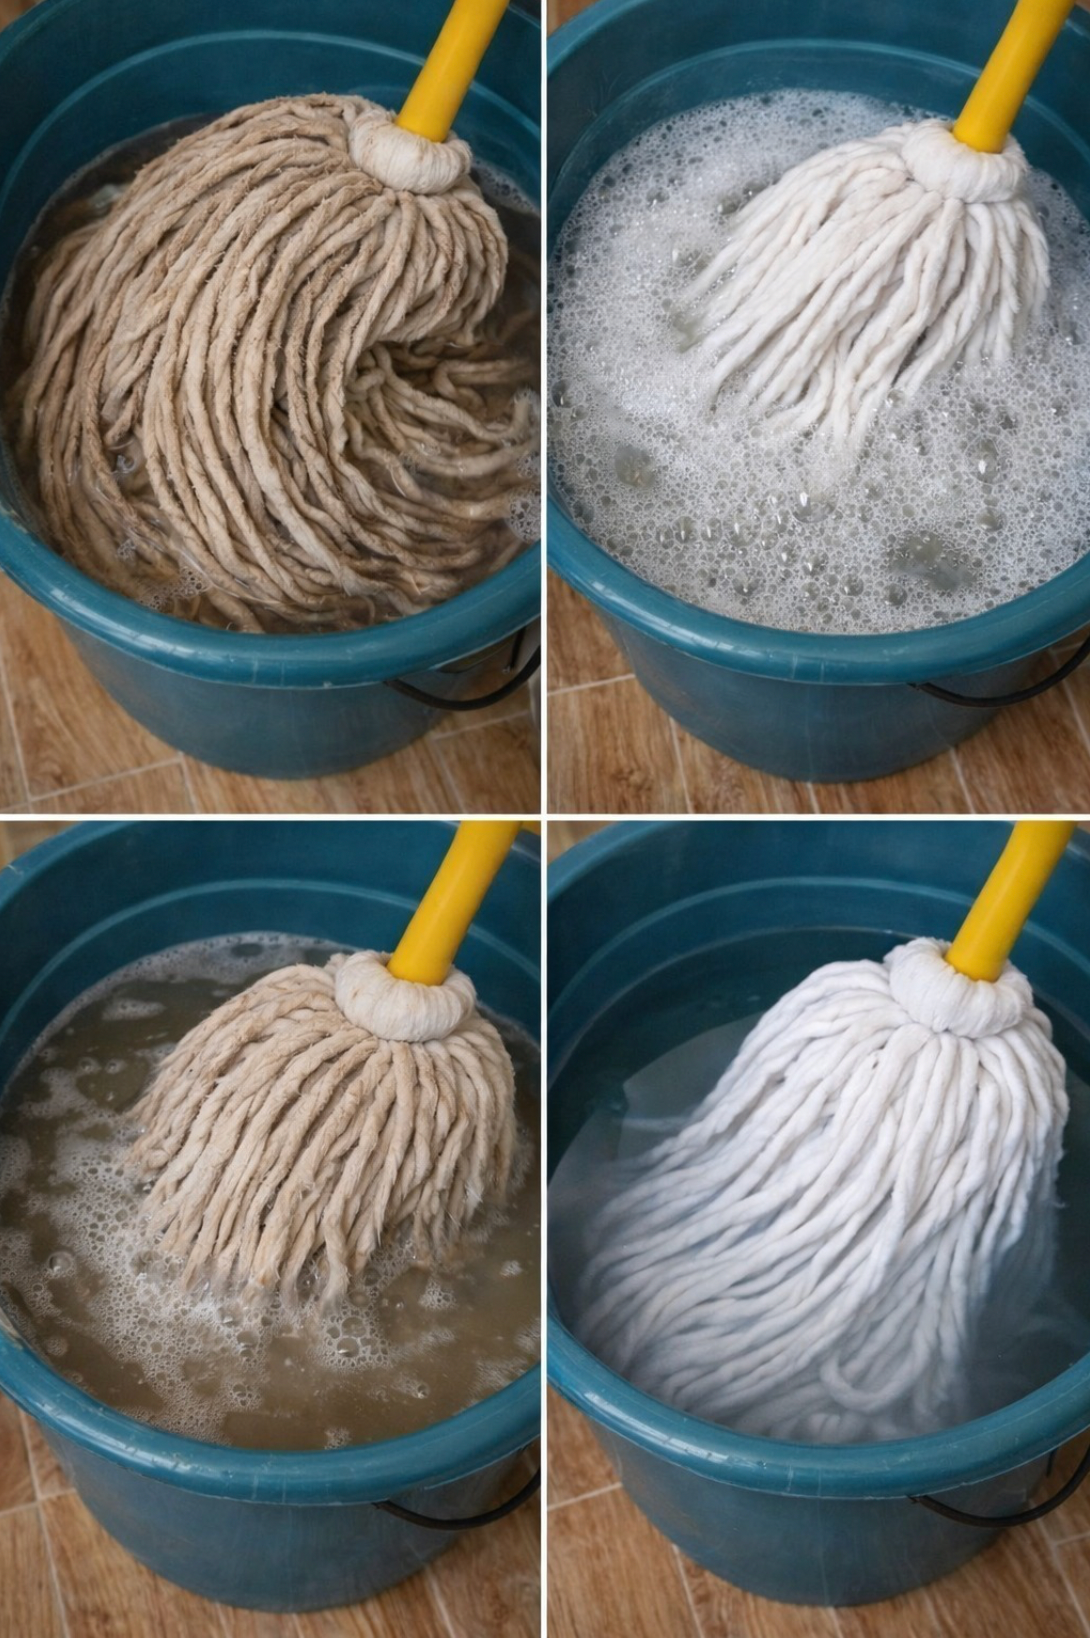
Step 1: Shake and Rinse
Start by removing loose debris.
- Shake the mop outdoors or over a bin
- Rinse thoroughly with warm water
This removes surface dirt before deep cleaning.
Step 2: Prepare the Cleaning Solution
In a bucket or large container, mix:
- Warm water
- A small amount of white vinegar
You don’t need a large quantity—just enough to soak the mop head fully.
Step 3: Soak the Mop
Place the mop in the solution and let it soak.
Recommended Time
- 30 minutes to 1 hour
During this time:
- Vinegar breaks down residue
- Odors begin to fade
- Fibers loosen
Step 4: Optional Boost for Heavy Dirt
If the mop is extremely dirty, you can enhance the cleaning power by adding:
- A small amount of baking soda
- Or a drop of dish soap
This combination helps:
- Lift grease
- Improve cleaning action
Step 5: Rinse Thoroughly
After soaking:
- Rinse the mop under running water
- Squeeze repeatedly until water runs clear
This step is crucial to remove loosened dirt and any remaining solution.
Step 6: Dry Properly
Drying is just as important as cleaning.
Best Practice
- Hang the mop in a well-ventilated area
- Allow it to air dry completely
Avoid leaving it damp, as moisture encourages bacteria and odors.
What You’ll Notice After Cleaning
After this process, your mop should:
- Smell fresh instead of sour
- Look noticeably cleaner
- Feel softer and more flexible
- Absorb water more effectively
It may not look brand new, but its performance will improve significantly.
Alternative Ingredients That Also Work
While vinegar is highly effective, other options can also help.
Baking Soda
- Neutralizes odors
- Helps remove stains
Often used together with vinegar for deeper cleaning.
Lemon Juice
- Natural deodorizer
- Mild antibacterial properties
Adds a fresh scent while helping break down residue.
Dish Soap
- Cuts through grease
- Helps remove oily buildup
Useful for kitchens or heavily soiled floors.
When You Should Replace the Mop
Even with proper cleaning, mops don’t last forever.
You should consider replacing your mop if:
- Fibers are worn out or falling apart
- It no longer absorbs water properly
- Strong odors persist after cleaning
- The structure is damaged
Cleaning extends lifespan, but it cannot reverse physical wear.
How to Keep Your Mop Cleaner for Longer
Prevention is just as important as deep cleaning.
1. Rinse After Every Use
Always rinse thoroughly to remove dirt and cleaning chemicals.
2. Don’t Leave It Wet
Dry the mop completely to prevent bacteria growth.
3. Avoid Overusing Dirty Water
Change your mop water regularly during cleaning.
4. Deep Clean Weekly
A quick soak once a week prevents heavy buildup.
5. Store Properly
Keep the mop in a dry, ventilated space.
Common Mistakes to Avoid
Using Too Much Cleaning Product
Excess soap can leave residue that makes the mop dirtier over time.
Skipping the Rinse Step
If you don’t rinse properly, dirt remains trapped.
Leaving the Mop Soaking Too Long
Extended soaking can weaken fibers, especially in certain materials.
Storing While Damp
This leads to mold, bacteria, and bad smells.
Why This Simple Trick Works So Well
The effectiveness of this method comes from combining:
- Chemical action (vinegar breaking down residue)
- Time (soaking allows penetration)
- Mechanical action (rinsing removes debris)
Together, these steps restore the mop’s function without needing expensive products.